Okay, let me tell you what happened to my neighbor Jake last month.
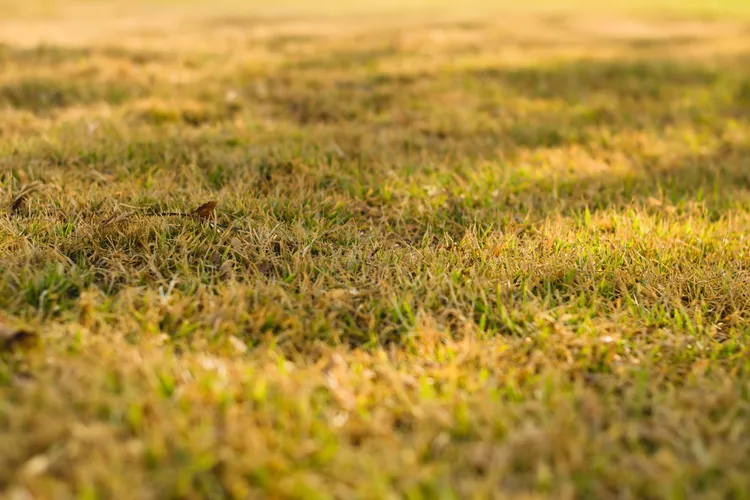
Saturday morning rolls around, and Jake’s out there with his coffee, feeling pretty good about his lawn care game. He’d been watering religiously, fertilizing on schedule – doing everything “right.” Then he looks down and sees these weird yellow patches everywhere.
The poor guy was devastated. Called me over, thinking maybe his sprinkler system broke or something.
Here is the crazy part though – Jake’s problem is super common. I mean, ridiculously common. Every spring and summer, homeowners from Phoenix all the way up to Seattle deal with the same frustrating yellow grass nightmare.
But you know what I have discovered after helping dozens of neighbors figure this stuff out? Most of these yellow grass situations are not that complicated to fix. Your lawn is basically screaming at you, telling you exactly what’s wrong. You just gotta know how to listen. I have spent way too much time researching this stuff (my wife says I’m obsessed), and I have found eight main reasons grass turns yellow. Everything I’m sharing comes from actual lawn care studies and, honestly, trial and error in my own backyard.
Reading Your Lawn Like a Book
Your grass is way smarter than you think. It is constantly giving you hints about what’s bothering it.
See those weird circular spots with dark green edges? That’s classic dog damage right there. Dog urine contains urea, a form of nitrogen that results from digesting proteins. When your pup keeps hitting the same spots, the grass basically gets nitrogen poisoning. The green ring around the damage? That’s where the pee got watered down enough to work like fertilizer.
Got big dead patches that lift up super easily. when you grab them? Grubs. Those little white worms are having a party under there, eating all your grass roots.
Notice perfect yellow rings, that look almost too neat? Welcome to fungus town. These diseases love making those fancy circular patterns.
Whole lawn looking washed out and sad? Usually means you have got fertilizer issues or your grass is starving.
Yellow starting at the tips and creeping down? Classic nitrogen shortage. Nitrogen deficiency causes gradual yellowing starting with older grass blades.
Once you know what to look for, diagnosing becomes way easier.
Problem 1: Your Dog is Accidentally Sabotaging Your Lawn
Look, I love dogs. Got two myself. But let’s be honest – they are absolute lawn killers. My Golden Retriever has this favorite spot right by the mailbox. Same spot, every single day. Took me forever to figure out why that one area kept dying no matter what I did.
Here is what’s happening: Dog urine contains urea, a form of nitrogen that results from digesting proteins. A little nitrogen makes grass happy and green. But when Fido keeps using the same bathroom spot over and over? It is like dumping fertilizer concentrate in one place. The grass literally burns to death.
Catching Your Dog in the Act
The damage pattern gives it away every time. Brown or yellow patches of grass appear where your pup usually pees, and you will often see dark green patches of grass appear where your pup usually pees if your lawn was already low on nitrogen. That green ring? Pure nitrogen fertilizer effect where the urine spread out. Try this Follow your dog around for a couple days. Note their favorite spots. Bet you will connect the dots immediately.
What Actually Works (I have Tried It All)
The hose trick. When your dog finishes doing their business, grab the hose and soak that area good. This dilutes all that concentrated nitrogen before it fries your grass.
Diet changes help. My vet told me something interesting: A dog eating processed proteins will have a higher urea and nitrogen content in urine than a dog that eats fresh proteins. We switched our dogs to better food, and honestly, it made a difference.
Designate a pee zone. Sounds weird, but it works. Use positive reinforcement to train your dog to urinate in an area with mulch or gravel. No grass means no dead grass.
Fixing What’s Already Dead
Dead spots need the full treatment. Overseed the affected areas with grass seed to encourage new growth. One trick I learned – raise your mowing height since higher grass is less sensitive to nitrogen. Worked great for us.
Problem 2: Underground Grass Murderers (Grubs)
Grubs are sneaky little jerks. All summer long, they are down there having an all-you-can-eat buffet on your grass roots. You don’t notice anything until late August when suddenly half your lawn looks terrible. My buddy Mike learned this the hard way. Spent all summer babying his lawn, couldn’t figure out why sections kept dying. Finally dug up a bad spot and found dozens of fat white grubs just chomping away. Grubs are the larval stage of several beetle species, and they snack on grass roots. Adult beetles lay eggs in your turf in spring, then the babies spend months eating your lawn from the inside out.
The Three Worst Offenders
White Grubs are the most destructive. You will see areas of your lawn thinning and yellowing in late summer, when grub damage is greatest. By fall you have got irregular brown patches everywhere.
Billbugs hit earlier. Billbugs appear in June–July and eat from the stem of grass blades into the roots, causing large brown/yellow areas of grass amongst small patches of green grass.
Cranberry Girdler makes a specific pattern. Cranberry girdler creates large yellow patches of grass with darker dead patches in late summer and early fall.
The Dead Giveaway Test
Here is how I taught Mike to check: Try pulling up the dead grass. If large sections of your grass can be pulled up easily, you likely have a grub problem. Healthy roots don’t give up that easily. Want proof? Dig up a small section where the grass is dying. You will find white, C-shaped larvae about an inch long if grubs are your culprits.
Getting Rid of These Pests
Prevention beats trying to kill them after they have already trashed your lawn. There are preventative treatments for lawn insects that can help you avoid damage in the first place. Apply these in late spring before those beetles start laying eggs. Already got an infestation? There are products that can help, but honestly, different grub types need different treatments. A professional can tell you exactly what you are dealing with.
Problem 3: Your Grass is Literally Starving
Nitrogen is what makes grass green. No nitrogen = no green. It’s that simple. This was actually my first major lawn disaster. New homeowner, thought I was doing great, then my whole lawn started looking pale and sickly. Neighbor Bob (guy knows everything about lawns) took one look and said, “When’s the last time you fed this thing?”
Spotting a Hungry Lawn
The symptoms creep up slowly, but they are pretty obvious once you know them. The best way to determine your lawn’s nitrogen levels is to conduct a soil test. But even before testing, you can see the signs: super slow growth, thin patches everywhere, yellowing that starts with older grass blades first. Your lawn looks weak and sad instead of thick and vibrant.
Feeding Your Grass Properly
Test first, guess never. At-home soil tests are available, but they will not provide as detailed information as a laboratory test. The lab results tell you exactly what your grass needs and how much.
Pick good fertilizer. Apply a fertilizer with nitrogen – that part’s easy. I like organic options when possible. Milorganite may be an effective solution. This eco-friendly, slow-release fertilizer has been used since 1926 and works on yellow grass and slow-growing grass.
Timing is everything. Cool-season grasses want nitrogen in early spring and fall. Warm-season grasses need it late spring through summer. Follow the schedule, not your gut.
Problem 4: The Goldilocks Water Problem
Water is tricky because too much and too little both make your grass look awful, just for different reasons. I learned this lesson the expensive way. First year, I barely watered, and half my lawn died from drought. Next year, I overcompensated and watered every day. Root rot killed different sections. My wife still gives me grief about it.
When You are Drowning Your Grass
Overwatering (too much water) can lead to root rot while watering too little creates stressful drought conditions, and both can cause your yellow grass. Overwatered grass feels squishy when you walk on it. You will start seeing more fungus problems popping up. The roots get lazy and stay near the surface because water’s always available.
When Your Grass is Dying of Thirst
Drought stress looks completely different. Here is an easy test: Checking for dried-out lawn is easy: pull up on the grass. If grass blades come up, then the grass needs more water.
The Sweet Spot for Watering
Professional recommendation: Most mature, established lawns require 1 to 1.5 inches of water per week. But here is the key – frequency matters more than total amount. It’s better to water your lawn deeply once a week than to water briefly three times a week. Deep, infrequent watering forces roots to grow deeper and stronger.
The Tin Can Method (Seriously, It Works)
Not sure how much water you are actually putting down? Place a few tin cans within the garden hose or sprinkler’s irrigation range. After watering, calculate the average water depth in all the cans. This old-school trick shows you exactly what your grass is getting. Saved me from a lot of guesswork.
Problem 5: When Love Kills (Fertilizer Burn)
We have all been there. You want the best lawn on the block, so you figure more fertilizer equals better results. Wrong. So wrong.
My first attempt at fertilizing was a disaster. Applied twice the recommended amount because I wanted faster results. Within a week, my front yard looked like someone had taken a blowtorch to it.
Recognizing the Burn
If your whole lawn looks yellow, it could be a fertilizer burn. The grass turns yellow because the excess fertilizer burns the grass blades. The timing always gives it away. Did the yellowing show up just a few days after fertilizing? There is your answer.
Avoiding This Expensive Mistake
Read the label. Follow the label. Make sure you follow product recommendations when fertilizing your lawn to avoid burning it. I know it’s tempting to think more is better, but fertilizer does not work that way.
Watch the weather. Never fertilize right before heavy rain or when your grass is wet. The chemicals concentrate and turn into lawn poison.
Calibrate your spreader. Most burns happen because spreaders are not set right. Test your settings on the driveway first.
Damage Control Mode
Act fast if you think you overdid it. If you think you have added too much liquid fertilizer to your lawn, try to dilute it by immediately watering the area. Flood that area with water. Check the roots to see how bad the damage is. If roots are still alive, water the area very well—with luck, the grass may revive itself. Dead roots mean you are starting over with new seed.
Problem 6: Fungus – The Shape-Shifting Lawn Killer
Fungal diseases are annoying because they are hard to diagnose. But there are three common ones that make pretty specific patterns.
Ascochyta: The Timing Disease
This one’s weird. Ascochyta causes splotchy yellow areas on your grass that appear when hot weather directly follows a cool rainstorm. It’s all about that specific weather pattern. Good news is, Ascochyta usually only affects the top part of the lawn. Solution: aerate the lawn. Opens up airflow and helps recovery.
Necrotic Ring Spot: The Patient Disease
Necrotic Ring causes rings of yellow grass to appear on your lawn. This fungus can be spread through dirty aerators and usually lasts for about 5 years before dissipating.
Yeah, five years. That sucks. Unfortunately, there are currently no effective solutions to get rid of this disease. But you can manage it: Necrotic ring can be managed by following correct watering guidelines and overseeding affected parts of the lawn with disease-resistant ryegrass.
Yellow Patch: The Wet Weather Problem
Yellow patch appears during long periods of cool, cloudy, and wet weather. Thrives when temperatures hang between 50 to 65 degrees Fahrenheit. This mainly hits cool-season grasses like bluegrass and fescue during fall, winter, and spring.
Fighting Back
Generally speaking, the best way to treat a lawn disease is with improved maintenance. Poor maintenance practices create an attractive environment for lawn fungus. Focus on proper watering techniques, good aeration, and keeping your grass healthy enough to fight infections naturally.
Problem 7: Your Mower is Secretly Destroying Your Lawn
Plot twist: Sometimes the tool you think is helping is actually what’s killing your grass.
I did this for years before I figured it out. Kept cutting my grass super short, thinking it would stay neat longer. Instead, I was basically scalping my lawn every week.
The Scalping Disaster
If you have been cutting your grass too short, your lawn may be showing signs of scalping. Scalping is when you cut the grass so low that it’s unable to photosynthesize. What happens next? The grass can not make food, fades to yellow, and becomes a target for every pest and disease in the neighborhood.
The One-Third Rule (Actually Follow It)
Never cut more than one-third of the grass blade’s height in a single mowing. This rule exists for a reason – ignore it and you will stress your turf into oblivion.
Different grass types have different sweet spots:
– Kentucky Bluegrass: 2.5 to 3.5 inches
– Tall Fescue: 2 to 3 inches
– Common Bermudagrass: 1.5-2.5 inches
– St. Augustinegrass: 2.5-3 inches
When Your Blades Are Toast
Dull mower blades don’t cut – they tear and shred. This creates ragged, yellowish grass tips that look terrible. Fix: Sharpen your mower blades to achieve a clean, crisp cut. Do this once a year or about every 25 hours of cutting time. Most lawn mower shops will do it for cheap.
Problem 8: Suffocated Grass (Soil Compaction)
Compacted soil is like trying to grow plants in concrete. Your grass roots literally can’t breathe, drink, or eat properly. This was a huge problem in my backyard for years. Kids playing, dogs running around, lots of foot traffic. The soil got packed so hard I could barely stick a screwdriver in it.
Spotting the Problem
Easy test: Take a soil sample. If it’s gray, hard soil, it’s too compacted.
Also watch how water behaves during rain or watering. If water runs off high parts of your lawn quickly and pools in lower parts of the lawn, your soil is definitely too compacted.
What Causes This Mess
Compact soil is often caused by overwatering and excessive foot traffic. Clay soils (super common in Texas and parts of Colorado) are naturally prone to this problem.
The Fix That Actually Works
Core aeration is your answer. To help remedy compacted soil and dethatch your lawn, aerate it. This creates thousands of holes that let air, water, and nutrients reach your grass roots. You can rent aerators from home improvement stores, but honestly, professional services usually do a way better job.
Your Game Plan: Simple Steps to Fix This
When yellow grass shows up, here is exactly what to do:
Step 1: Study the Damage Pattern
– Circular spots = dog pee or chemical spills
– Big irregular dead zones = grubs or disease
– Entire lawn looking pale = nutrition or water problems
Step 2: Get Your Hands Dirty
– Try tugging on the yellow grass (if it lifts easily, think grubs or drought)
– Test soil hardness with a screwdriver or garden tool
– Think back – what have you done recently? Fertilizer? Chemicals? Watering changes?
Step 3: Consider the Calendar
– Spring yellowing often means winter damage or early stress
– Summer problems usually involve heat, drought, or bugs
– Fall yellowing could be peak grub damage or natural grass dormancy
Prevention Beats Reaction Every Time
Honestly, preventing these problems is way easier than fixing them after they’ve trashed your lawn.
Test your soil once a year. Know what nutrients you are working with. Most grasses are happiest with pH between 6.0 and 7.0.
Water smart, not hard. Deep, less frequent watering builds stronger root systems that handle stress better.
Don’t scalp your grass. Proper mowing height helps grass develop deeper roots and better disease resistance.
Aerate when needed. Fall for cool-season grasses, spring for warm-season types.
Keep your eyes open. Catch problems early and solutions are cheaper and way more effective.
Time to Get Your Hands Dirty
Look, most yellow grass problems follow pretty predictable patterns. Once you figure out what’s causing the issue, the fixes are usually pretty straightforward. Start today by really looking at your grass. Check out those visual patterns we talked about. Try some of the simple tests like pulling grass and checking soil hardness. Think back to recent activities – fertilizing, watering changes, chemical applications. The timing often tells you everything you need to know. Remember, catching these problems early saves both time and money. A small fix now beats a complete lawn renovation later.
If you are dealing with complex diseases or multiple problems hitting at once, don’t be stubborn about calling in professionals. They have got the experience and proper tools for accurate diagnosis. Your dream of having that amazing, thick green lawn? Totally achievable. Homeowners across Seattle, Denver, Phoenix, and throughout the West successfully tackle their yellow grass problems using these exact methods.
The secret sauce is actually taking action instead of hoping the problem fixes itself. Trust me, your grass – and probably your neighbors – will definitely notice the improvement.