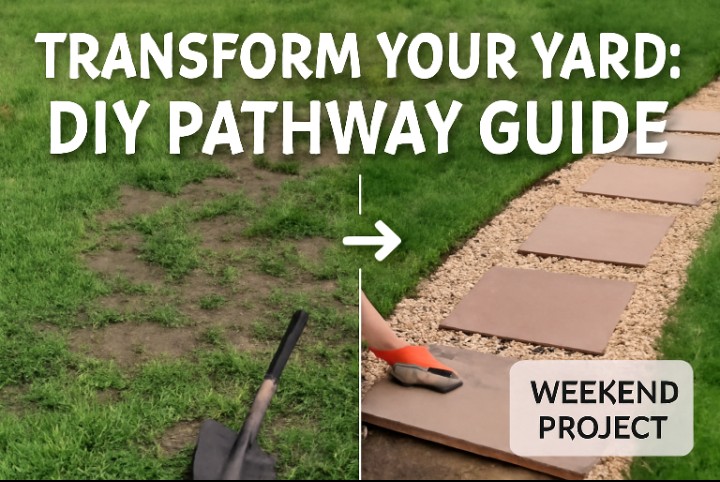
Fed up with dirty paw prints soiling your garden? Is your lawn tired from traffic patterns trodden in by family members? Defining a walkway through long grass is not just about looks—it’s a smart choice that preserves your lawn while adding personality to your yard.
A well built path in high traffic areas means no more soil compaction, better drainage, and it looks nice too! Whether you want to link your patio to your garden shed or provide a meandering walkway through your backyard, this guide will help explain how to make diy pathways that are both functional and look pretty.
The best part? You don’t need to be a landscape architect or have professional landscaping experience, and you don’t need to spend a lot. With affordable and easy-to-come-by materials, a day or weekend of labor, plus some TLC for any shrubs straddling the trail, you can turn those old grass lanes into attractive, hardy walkways. Now, let us look at your budget-friendly DIY options and stand up.
Planning Your Pathway Project
Assess Your Site Carefully
Before you start digging with a shovel, spend some quality time in your yard. Where does your family naturally roam? Good traffic2 areas These are excellent places for pathways. Observe how water flows during rain storms — you may need to accommodate drainage patterns when planning your patio.
Measure the intended pathway carefully. A normal walkway should be at least 3 to 4′ wide, which will make room for comfortable walking or side-walking. If a garden path is narrower, and single-file walking appropriate 2-3 feet would be enough.
Examine the slope and grade of your property. Drainage, Material Choice Even the smallest of gradients will impact draining, and thereby material choice. If you plan to dig deeper than about few inches, call your utility company to mark any line buried underground. This free resource might just prevent you from making a costly (and dangerous) mistake.
Understanding Your Budget
One of the primary benefits of DIY walkways is pricing freedom. You’re looking to pay roughly $2 to $10 per square foot, depending on your material. Here are the biggest ones:
Budget-Friendly Choices:
– Chip wood is the least expensive at around $0.45 per square foot. They produce a soft, informal effect ideal for cottage gardens or woodland conditions.
– Gravel costs between $0.78 and $1.70 per square foot. It is durable, drains easily and performs well during freeze-thaw cycles compared with rigid materials.
Mid-Range Options:
– At about $1.33 per square foot, concrete provides a clean, modern look.
– Pavers are about $1.87 per square foot but offer unlimited design options and long-lasting durability.
For say, a common 20-foot path measuring 3 feet wide (or 60 square feet) it can run you from $27-$112, versus $80-$600 for just concrete or pavers. Many home owners will be found mixing gravel and stepping stones, as combining them is a great option when considering that durability factor.
Essential Tools and Materials
Tools You will Need
You likely already have the majority of these basic tools:
– Flat spade or edger to cut through the grass
– Garden rake used to spread and level the materials
– You need a wheelbarrow to carry the soil and other materials
– Layout line and stakes to mark for perimeter corners.
– A torpedo level to guarantee the appropriate slope for drainage
Core Materials for Success
No matter what the path type, some materials are pretty much universal:
Landscape fabric (weed barrier) is essential for paths that will last. This permeable material acts as a barrier, obstructing sunlight from entering the soil and minimizing weed growth, while allowing water to drain freely.
Base Layer materials offer stability and drainage. Under stepping stones, sand can be used effectively as a leveling aid. Crushed gravel provides a stable surface for walking, and it prevents muddy conditions.
Anchor pins / landscape staples holds your weed barrier in place. Don’t scrimp here — the stuff needs to be long enough to overlap and prevent weeds from germinating where there’s a slack seam.
Your surface material will be determined by your pathway style: stepping stones, decorative gravel, wood chips, pavers or a mix of alluvia.
The Top 4 No Fail DIY Pathway Styles
Stepping Stone Path: Traditional, Yet Purposeful
CRAZY PAVING (Mixed Irregular Sizes) Crazy paving paths are perfect in casual gardens and can cope with light to medium foot traffic. They install with surprising ease and can be seeded and grow grass or ground cover between the stones for a more natural appearance.
Getting Started with Layout
Place your stones on the grass surface. Space them 18-24 inches apart–this is a comfortable stride length which avoids the awkward hop-step between stepping stones. Walk back and forth through the path multiple times, fine-tuning stone placement until it feels right. Once satisfied, spray paint or flour around each stone.
The Excavation Process
Take out each marked stone then put to the side. With your flat spade, cut around the outlined area and remove turf. Remove another 2-3 inches down from the grass, and continue to go deeper. This depth provides room for your base layer and makes the stone level with or slightly above the surrounding grass.
Creating a Stable Base
Fill the holes with one to two inches of sand or crushed gravel. This layer has a dual purpose in that it ensures drainage and makes leveling easier. Add more sand or remove if necessary until you get the correct height.
Here’s a key detail many DIYers overlook: The stones must taper away for water runoff — about 1/4-inch per foot downward from structures. You can check this with a torpedo level as you go along.
Setting the Stones
Affix each stone securely in the sand foundation, give a rock back and forth to settle. The stone should be firm, not wiggly. Stand on it and shift your weight — if it moves, add more base material and re-level.
Finishing Touches
The gaps between stones fill with dirt and grow weeds if not covered. Backfill them with stone dust, topsoil or decorative gravel. Some homeowners plant low-growing ground covers such as creeping thyme between stones for a living pathway emitting fragrance when it’s stepped on.
Gravel Path: Down to Earth and Durable
Gravel paths can be beautiful in high-foot traffic areas and work well in any climate. In cold climates, they’re particularly useful, because the freeze-thaw cycles won’t heave and crack the surface as it can with concrete or pavers. This shouldn’t be more than a few inches deep, even if you live in an area with rough winters.
Preparing the Ground
Clear away all grass and weeds from your pathway space. For problem weeds, you could use an herbicide, spacing applications a minimum of 3 days apart and before you install.
Installing Edging
Edging holds the gravel in place and prevents it from spreading into the surrounding grassy areas. Metal edging is long-lasting and forms clean lines. Plastic edging is less expensive and easier to bend for curves. Stone or brick edging is more of a classic look, but takes longer to install.
Your edging should be placed 1-2 inches higher than your eventual gravel. This lip was created to keep gravel from spilling out and at the same time make it possible to pull a rake across the unit so you can smooth it back down.
The Critical Weed Barrier Step
Landscape fabric is your canny trick to eliminating future maintenance headaches. It prevents sunlight from reaching the soil, causing weed seeds to stay dormant and minimizing herbicide use as well as hand-weeding.
Spread the fabric over your path. And when you’re covering large areas, overlap seams by several inches or more to keep weeds from making their way through the cracks. Snip small openings along the edges of the fabric for rounded curves (which will help when it comes to folding).
Fasten the fabric with ground staples, approx 8-12 inches intervals along perimeter and spaced every 12″ apart in between. This may feel like overkill, but properly secured fabric will hold for years. Loose fabric moves and bunches, making humps in valleys in your finished path.
Laying the Gravel
Professional landscapers do a two-layered application. Begin with a 2- to 3-inch crushed stone base — the angular particles of this material lock together to form a tight, solid base. Cover this with 2-3 inches of decorative stone. Pea gravel (1/4 inch to 3/8 inch in diameter) is a great option because it feels good underfoot and has a nice color.
Rake the gravel smooth, and tamper it down by hand or with the back of your rake. Decorative gravel shouldn’t be over-compacted, so it stays somewhat loose for adequate drainage.
Mulch or Wood Chip Pathway: On the Cheap and Natural
The most cost-effective option that’s still aesthetically pleasing is wood chips or shredded bark mulch. The organic materials allow for a comfortable floor to walk on, and look natural in the garden. They are particularly popular in vegetable gardens and woodland-style landscapes.
Ground Preparation
Dig out your current grass and weeds, digging a shallowed hole 2-3 inches deep. This small amount of bowl shape helps keep the mulch in place, and makes it less likely to wash away in heavy rains.
Weed Barrier Decision
You have a choice here. For permanent but low-maintenance paths, lay landscape fabric as directed in gravel path section, then spread mulch on top. For a more natural look, where you don’t mind the occasional weeding and prefer mulch to decompose and enrich soil, omit the fabric and cover bare earth with mulch.
Applying Mulch
Evenly spread 3-4 inches of wood chips or shredded bark on the path. It must be deep enough to prevent footprints from walking and yet it is comfortable to walk on. “Don’t use cypress or treated wood,” as both of those types of mulch “do not decompose well and may be chemically treated.”
Here’s a money-saving tip: reach out to your local tree service companies. And many will give you fresh wood chips free, since it saves them the cost of disposal. Free mulch is often available to residents through municipal programs.
Defining the Edges
In the case of mulch paths, clear edging is a bonus. The natural wood edges complements the material perfectly. Stones create attractive contrast. Even living edges of (ornamental grasses or low-growing perennials) can serve to define your pathway, and add visual interest.
Maintenance Reality Check
Your organic mulch, unlike gravel or stone, will rot away. Expect to replace your mulch pathway every year. The upside? Decomposed mulch enriches your soil. The downside? It’s time-consuming and laborious to maintain every year.
Plan: Mix it Up: Stepping Stones & Gravel
For those home owners looking for a little bit of everything Try using stepping stones mixed with gravel for appearances and functionality. The stones add stability, and the gravel fills in any gaps to reduce the amount of pricier stones required.
Installation Process
Trust the laying system: take steps one after the other in accordance with instructions for placing and leveling stones. After placing your stones, lay landscape fabric around them (cutting the fabric to fit snug against each stone) and fill in the surrounding areas with decorative gravel.
This combination of style is especially good to use in formal gardens and low-traffic areas. Will provide beautiful contrast and texture to your landscape without becoming waterlogged in all that rain.
Key Installation Tips for Long Lasting Results
Master Weed Prevention
The No. 1, hands-down most important thing to decide how your pathway will look in the long run is this: Weed control. Correctly laid down landscape fabric eliminates the need for chemical weed killers and hand weeding. For rock mulches, the best choice is non-woven fabric, which doesn’t allow stones to slowly sink into soil.
Always ensure the area for your pathway is completly clean before laying fabric. The old weeds and weed seeds will come to enliven where any tears or gaps are. Overlap all tilts generously — a few extra inches of fabric will cost pennies but save you years in frustration.
Get Drainage Right
Your path’s greatest enemy will be water. There is no pooling, erosion or frost heave in cold climates with drainage. The basic guideline is straightforward: pitch walkways 1/4-inch per foot. This easy incline is nearly imperceptible to pedestrians yet significantly increases water drainage.
Water should always be diverted away from buildings. If the pathway passes your house or a shed, have it pitch down away from their foundations. If the space does not allow water to drain naturally, you can build in a slight crown (higher center that slopes downward both ways) or use very permeable materials such as gravel.
Handle Curves Gracefully
Straight lines are easy to measure mathematically but often seem too formal/beady. Curve With Care Gentle curves add interest to landscapes and can create the illusion of a larger space in smaller yards by guiding the eye along the path.
When you are laying landscape fabric underneath a curved path though, make little snips on the outside edge. This enables the material to fan out and lay flat along the curve, without gathering or wrinkling. For curved pathways, make sure to use flexible edging material — plastic or thin metal (and not stone) because rigid materials either crack or pop out of place.
Material Selection Guide
The Right Stepping Stones
Natural Stone Choices such as blue stone, slate and flagstone with their distinctive hues and textures. No two stones are alike, making unique walkways. They’re more expensive but far stronger (a flagstone path can endure half a century). Flagstone generally runs between $3-$8 per square foot, slate costs from $4 to$10 per square foot and bluestone varies between$3 and $6 per square foot on average.
Machine-made Concrete Pavers are cheaper and uniform in size and shape. Continue to 5 of 6 below. Modern production methods make pavers that look very much like natural stone. They are also easy to work with because they have a uniform shape. Price: Pavers range from $1.50 to at least $3 per square foot, meaning they’re ideal for more expensive, large installations since the units are often sold by the square foot.
Use stones that are 16 to 24 inches in diameter for stepping comfortably. Smaller ones seem unstable, larger stones waste material and drive up costs. This type of stone, square or rectangular, is easier to install than round stepping stones and less frustrating than trying to fit stones with odd shapes based upon available space.
Understanding Gravel Types
But gravel is not just gravel. Each style has its own advantages that are better suited for your pathway’s use and climate.
Pea Gravel (1/4 to 3/8 inch smooth stones) is the most popular size for pathways, being easy on your feet and of excellent appearance. It’s offered in colors ranging from cream to terra cotta. But pea gravel doesn’t compact, and it can roll underfoot, which means that the surface frequently needs to be raked smooth and new pebbles added. Plan on adding new contents (fresh material) every 2-3 years.
Crushed Stones have angular edges and lock together when compacted, oriented as a base. It’s less pleasant to walk around on but more stable under your top layer of gravel. Its corner design allows it to be utilized space saving, which means a very firm footing.
River Rock is gorgeous, but it jiggles around and can’t be packed well. Use it infrequently as a decorative element, not the predominant pathway material. It’s best as a top decorative layer over the base crushed stone.
Decomposed Granite is a crushed rock that compacts to create a very hard surface. It forms a good, naturalistic surface that is often used in southwestern and modern yards. It will last for 3 to 5 years when moistened and packed slightly.
Jersey Shore Gravel and other local materials may be available on a per case basis. Find out what locally sourced materials from your regionality you can get at landscape suppliers that fit into your area’s natural look.
Selecting Edging Materials
Metal Landscape Edging for durability and modern, clean lines. It’s simple to install with a rubber mallet, and holds its form no matter how long it’s in place. Aluminum will not rust; steel edging is stronger, ifill but requires paint in wet climates. Metal edging lasts maybe 15-20+ years and costs $1-3 per linear foot.
Plastic Edging: The least expensive, this product is flexible and available in rolls to use for a curved path. Higher-quality plastic edging is UV-stabilized and will last 10-15 years. Pliable plastic quickly grows brittle and fractures after only a few seasons of use. Plastic edging of better quality can be expensive at $0.50 to $1.50 per linear foot, but because it is tried-and-true along with this being such a common project, skimping here won’t be visible.
Stone or Brick Edging gives your lawn a classic, high-end appearance. It’s harder to install — each stone or brick needs to be set level and firm. The result is amazing and in most of cases permanent. Budget $2-5 per lineal foot and lots of installation time.
Natural Wood Edging: For a casual garden, this looks great. Opt for a rot-resistant species such as cedar or redwood. Common wooden edging such as timber and sleepers will need replacing every 5-10 years due to its natural decomposition. Natural, unfinished cedar runs $1-2 per foot and is a lovely compliment to mulch paths.
Mistakes You are Probably Making That Suffocate Your Project
1. Base Prep Variance
Based on the surface and quality of the floor, some technicians under-prep or over-prep their floors.
The majority of DIY path failures occur due to poor base preparation. The absence of a sound base leads to stones sinking, gravel shifting and surfaces uneven. As foot traffic and weather push the material further into the pores, this issue compounds over time.
If possible, many homeowners forgo or skimp on the base layer to cut costs and save time. This economy is false when your $300 walkway needs to be replaced in full after a single season.
The Solution: Always ensure you dig deep enough, apply the correct base material and compact it well. These are annoying clicks during installation, but will save years of irritation. For stepping stones, that 2-3 inch layer of base is non-negotiable. When using gravel or stone for paths and walkways, two layers are necessary for long-term stability.
2. Ignoring Drainage
Pooling water on your pathway creates muddy messes that will prematurely age and corrode, horrible looking ice patches in the winter. Poor drainage also that weeds will grow in your boggy areas and robs your landscape fabric of its effectiveness.
before you work finalize their design on Test Your Site Drain cohasset would not sitcom before【Get Price】 Watch for standing or running water after heavy rain. Plan your road on a course that plays nice with natural drainage. If there is a low-lying area in the yard where water naturally collects, avoid placing your pathway there.
The Solution: Maintain working slope (minimum 1/4 inch per foot), divert water away from structures and use permeable materials in areas of poor natural drainage. If you have trouble spots, add a French drain next to the pathway to better control water.
3. Undersecuring Weed Barrier Fabric
Ground staples are cheap: I think they are about $10 for a box of 100. Yet many do-it-yourselfers use too few staples, attempting to save money or time. The economy in this not real economy: shifting fabric, gaps where weeds peep through and ultimately the frustration of ripping out the path and beginning all over again.
Unmoored fabric flops around as the ground beneath it moves, people walk on it and temperatures swing. Openings appear and we get weeds. Within one season, you will have to hand-pull weeds or apply herbicides anyway — costs that far outweigh those saved by using fewer staples in the first place.
The Solution: Use enough staples. Again space the pins 8-12″ apart along one edge and further part in the 12″ open point down through the center of your fabric. Overlap seams at least 6-12 inches for full weed stoppage. Yes, it takes extra time. No, you won’t regret it. Invest an extra hour and $15 worth of staples and you will save dozens of hours of future weeding.
4. Messing Up the Material Depth
Too shallow, and your pathway materials will sink into the earth or do nothing to stop weeds. Too deep means you are wasting your money and getting a thick, cumbersome surface to walk on. The right depth depends on your material choice and how much traffic you expect to receive.
The Solution: Stick to these, down to the letter!
– Pavers or stepping stones: 2-3 inch deep how if setting with stone flush or up to 1″ above ground level
– Gravel walking paths: 4-6 inch depth (2-3 inches of crushed stone base topped with 2-3 inches decorative gravel)
– Paths with mulch: 3 to 4 inches of mulch for effective coverage and soft stepping
– Pavers: 4 – 6 inches total (1″ – 2″ base coat + ½” – 1″ setting bed + thickness of the paver)
Be sure to measure accurately and mark pegs so you can maintain a consistent level all the way through your picture.
Care Of Your Pathway
Routine Maintenance Tasks
Don’t forget to set aside 10-15 minutes every month for basic maintenance. If you have a path in your garden, remove the leaves, sticks and detritus that gather there. This will prevent any decomposition from leaving a muddy patch, and keep your walking path looking clean. Decomposing organic matter also provides the perfect environment for weed seeds to grow.
Look for weeds that are coming up quickly — because pulling one or two small weeds is much easier than dealing with a full grown plant. Young weeds are pulled out readily; older ones resist, or can be killed with herbicide.
Look for drainage issues after a heavy rain. Water should run off immediately. Standing water suggests slope issues or obstructions that should be addressed before becoming worse.
Annual Maintenance
As you move into spring, take inventory of how your path is holding up. Stepping stones may require releveling after winter’s frost heave (frozen ground expands, moving stones). Fill any gaps between stones with stone dust, soil or gravel. Make sure each one is stable and level.
Gravel Paths: Over time, gravel paths are compacted and migrate. Replenish a 1″ layer of decorative gravel every 2-3 years to maintain its proper depth and polished look. Then rake the surface to mix new material with existing gravel and consolidate into a nice, finished surface.
Mulch Pathways: Mulch needs love the most — this organic material fully decomposes in 12-18 months. Expect to refresh wood-chip paths annually, generally either in spring or fall. Apply a new layer of mulch to keep it about 3- inches deep. As mulch breaks down, it feeds your soil, which helps neighboring plants.
All Paths: Inspect edging materials for any movement, cracking or gapping. Address repair issues as soon as possible to prevent greater damage. Plastic edging can crack and need to be replaced. Metal edging could be able to shift or rust. Stone edging may settle unevenly. Timber edging will eventually rot away and has to be replaced every 5-10 years.
Seasonal Maintenance
Spring: It is the height of pathway maintenance season. Winter damage must be repaired and supplies replenished, and any problems in drainage exposed by spring rains need to be taken care of. If stepping stones have broken or moved during freeze-thaw cycles, replace and re-set them. Re-apply the mulch to achieve the correct depth, as it has settled over winter.
Summer: Check for erosion during heavy rains. Pull weeds before they can go to seed — a single plant can generate thousands of seeds that remain viable in soil for years. Following hot, dry periods, make sure that a wood chip mulch hasn’t decomposed too much; such material can be freshened with a new layer if necessary.
Autumn: Rake up fallen leaves as quickly as possible – rotting leaves lead to muddy ground and also promote weeds. Get your walkway ready for winter by making sure it’s draining well so that no ice forms. This allows you the opportunity to check edging and base materials for potential issues before severe wintery weather comes.
Winter: Shovel off ice and snow from pathways. Do not use salt near plantings — it kills or injures your plants and damages most pathway materials. Sand offers traction without damaging plants. Sprinkling sand on gravel paths is safer than using salt. Sweep out sand as soon as spring to prevent gravel from becoming embedded permanently.
Your Weekend Project Awaits
Your backyard goes beyond making sure that your grass looks nice — it’s about creating a place where you feel relaxed and welcome. You will be able to wipe away the muddy feet prints, save your high traffic areas and add interest that makes your outdoor area feel even more inviting.
The secret of success is careful planning and right installation. Spend time on site assessment, select materials suitable for your budget and climate, and don’t skip essential steps like base preparation or weed barrier installation.
Begin with a straightforward, approachable project — maybe a short stepping stone walkway from your patio to the garden. Once you become more and more confident with the results, you can extend your pathway system all around the yard.
Yes, it’s true–you can have simple garden paths to create a walkway in just one weekend with basic tools and good old-fashioned elbow grease. And, don’t forget that all the things you learn on your first path you will apply to new landscaping projects. So get out your tools, select your materials and build the walkway your yard deserves.
Ready to Begin?
The most daunting aspect of any do-it-yourself project is the beginning. Do not wait for the “perfect” time or conditions. Pick a dry weekend, stock your materials and go for it. Your next self — that one who goes striding through the yard comfortably on a muddy spring day — will thank you for doing it.