You wake up Saturday morning. Coffee in hand. Your neighbor’s lawn looks like a golf course. Yours? Patchy and pale.
Their secret is not a $200 fertilizer bag. It is compost. Dark, crumbly, homemade compost.
I built my first pallet bin three years ago on a Sunday afternoon. By fall I had enough compost to topdress my entire front lawn. No bags. No chemicals. No regrets.
Here at Ex Landscaper we have tested this process many times. This guide gives you exactly what works.
Why Does Compost Help Your Lawn So Much?
Compost fixes your soil from the inside out. It loosens hard clay. It feeds the tiny organisms living underground. It holds nutrients right where grass roots can grab them.
With regular use you need less water. You buy less fertilizer. Your lawn stays greener longer.
Right now in 2026 hot composting is having a big moment. Gardeners are skipping slow cold piles. They want results in weeks not months. The no-till movement fits perfectly with composting too.
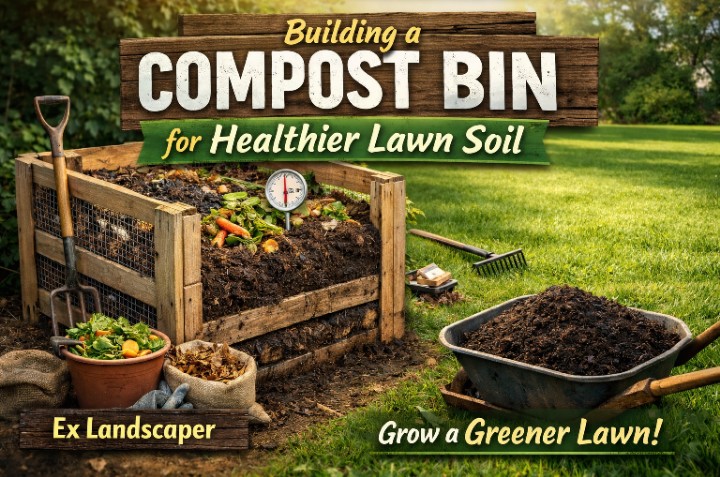
What Materials Do You Need to Build the Bin?
You do not need much. Here is everything to grab:
1. Wooden pallets or slats (4 to 5 pieces) — Main frame, at least 1m x 1m. Cost: $0 to $20. Recycled ones work great.
2. Wire mesh or chicken wire (1 roll) — Keeps air moving and pests out. Cost: around $15.
3. Stakes or 2×3 lumber (8 to 10 pieces) — Holds the corners firm. Cost: around $10.
4. Plywood or tarp for the lid (1 piece) — Controls moisture inside. Cost: around $10.
5. Hammer, drill and screws — For putting it all together. You likely already have these.
Total cost? Under $50. A plastic tumbler costs $100 or more. Build your own and keep the difference.
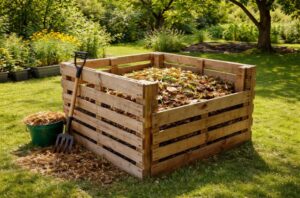
How Do You Build the Bin Step by Step?
1: Pick the Right Spot First
Find a sunny corner. Place the bin directly on bare soil. Avoid concrete because your pile needs contact with the earth below. Worms need to get in. Water needs to drain out. Level the ground with a quick rake and you are ready.
2: Stand Up the Back Wall
Take your first pallet and stand it on its short side. Push stakes through the ends deep into the ground. Go at least 20 to 30 cm down so it holds firm. Two people make this easier but one person can do it.
3: Add the Two Side Walls
Push the next two pallets tight against the back wall. Wire or zip-tie the corners together. Leave gaps in the panels so air can move through. A pile that cannot breathe breaks down very slowly.
4: Make the Front Easy to Open
Use removable slats or a simple hinged door for the front. You will be shoveling compost out from here later. Make it easy on yourself now. Lay a tarp across the top to manage moisture.
Quick Option: Straw Bale Bin
Not ready for a permanent build? Stack straw bales instead. They are cheap. They break down on their own over a season. A great way to start without any tools.
Build time is 1 to 2 hours. Done before lunch.
What Should You Put Inside the Bin?
Think of two types of material. Greens and browns. Both matter equally for a healthy pile.
Greens give nitrogen:
– Fresh grass clippings (no herbicide spray)
– Fruit and vegetable scraps
– Coffee grounds and tea bags
– Fresh garden trimmings
– Chicken horse or rabbit manure
Browns give carbon:
– Dry fallen leaves (shredded work faster)
– Torn cardboard and paper
– Straw
– Wood chips
Use 2 to 3 parts browns for every 1 part greens. This ratio keeps your pile cooking fast and smelling good.
Keep meat and dairy out completely. They bring rats. Also skip diseased plants and pet waste.
Read more: How To Make Your Own Pathway In A Grass Area: Step-By-Step Guide
How Do You Keep the Pile Working Well?
Moisture: How Wet Should It Feel?
Grab a handful and squeeze. One or two drops should come out. That is the sweet spot. Too wet? Add dry leaves or cardboard. Too dry? Sprinkle a little water. Simple as that.
Turning: How Often Should You Flip It?
Flip it once a week. Use a pitchfork or an aerator tool. This pushes fresh air in and speeds everything up. Five minutes of work. Huge difference in results.
Temperature: Why Does Heat Matter Here?
A hot pile breaks things down faster. Aim for 130 to 160°F inside. At that heat many weed seeds and harmful bacteria die off. You do not need a thermometer. Push your hand in near the center. If it feels very hot you are in good shape.
Keep turning and keep it moist. That is how you hold the heat.
Finished compost smells like forest soil. Dark and crumbly. That is harvest time. Hot composting takes about 6 weeks. Cold composting takes several months.
Common Mistakes That Slow Everything Down
Too much shade slows the breakdown. All greens and no browns makes a slimy smelly mess. Never turning it means it just sits there. Bury your food scraps under browns so animals stay away.
When Should You Start Based on Your Zone?
Zones 3 to 5: Cold Winter Areas
Start in April when the ground thaws. Compost through summer. Apply topdressing in September before the first frost. Good for fescue and bluegrass lawns.
Zones 6 to 7: Middle Climate Areas
Run your pile almost all year. Best times to topdress are March through April and again in October. Bermuda grass responds well to fall applications.
Zones 8 to 10: Warm Climate Areas
Start as early as February. Apply in spring for warm-season grasses like Bermuda Zoysia and St. Augustine. Two applications per year are possible here.
No matter where you live vermicomposting works year-round indoors. Red wigglers turn scraps into rich material through winter.
Read more: How to Build a Lawn Border: Complete Guide
How Do You Put Compost on Your Lawn?
Topdressing an Existing Lawn
Aerate first. Poke holes 3 to 6 inches apart across your yard. Then spread a thin layer of compost about a quarter to half an inch deep. Work it into the holes. Water lightly after. Come spring the lawn greens up noticeably.
Do this once a year. Over time you use far less synthetic fertilizer.
Starting a New Lawn or Overseeding
Mix 1 to 2 inches of compost into the top 4 to 6 inches of soil. Do this before you seed or lay sod. New roots love that loose nutrient-rich environment.
What Will You Actually Notice?
Roots grow deeper and stronger. The lawn needs less watering in summer. Bare patches fill in over time. Weed pressure drops. Soil pH balances out naturally in the 6 to 8 range which suits most grass types.
The END
You do not need a perfect yard. You do not need a big budget. You need a bin some kitchen scraps some dry leaves and a little patience.
Start this weekend. Toss in what you have. Flip it weekly. By fall you will have dark crumbly homemade compost ready to go.
Build it. Fill it. Topdress it. Watch your lawn transform.
Every zone. Every budget. Every skill level. It works. And once you see that first green flush after your homemade compost hits the soil you will never look at a fertilizer bag the same way again.
FAQs
What size bin works best for a lawn?
Go with at least 1m x 1m x 1m. That is about 3 feet on each side. Smaller bins do not hold enough heat to break things down properly.
Does the bin need a floor?
No floor needed. Bare soil is better. Worms move in freely and water drains out
. Add wire mesh to the base only if rats are a real problem in your yard.
Where exactly should the bin sit near the lawn?
A sunny spot directly on level ground is ideal. Nutrient-rich liquid drains from the pile straight into your soil below. That is free plant food.
How do you stop animals from getting in?
Bury scraps under browns every time. Use wire mesh on the sides. Skip all meat and dairy. Turn the pile regularly. A well-managed pile rarely attracts pests.
How fast can you get lawn-ready compost?
With weekly turning and the right moisture hot composting takes about 6 weeks. Cold composting is slower and takes several months.
Are fresh grass clippings safe to add?
Yes. Just balance them with twice as many browns. Wait a few weeks after any herbicide spray before adding clippings.
Why does the bin smell bad?
Usually too wet or too many greens. Add dry cardboard or leaves then turn the pile. The smell clears up in a day or two.
How much compost goes on an established lawn?
A quarter to half an inch per year is plenty. Always aerate first so the compost reaches the soil below.
Ok Thanks for reading and if you have any question just comment bellow bro. Bye bye
Read more: How to Install Landscape Edging: Complete DIY Guide for Professional Results