Think, you mow your lawn. You water your plants. But something still feels off. The yard looks messy. Unfinished. Like it’s missing something.
Most of the time, the problem is the edges.
Landscape edging creates a clear clean line between your garden beds and the surrounding grass. That one simple border changes everything. It makes the whole yard look sharp and intentional. According to Virginia Tech research, proper landscape edging can increase property value by 5.5% to 12.7%. That’s real money from a weekend project.
In 2026, eco-friendly and low-maintenance options are leading the way. More homeowners and developers are choosing recycled and eco-friendly materials to reduce their environmental impact. Recycled plastic edging is one of the top picks right now. More on that below.
This guide from Ex Landscaper covers everything. Materials, Tools, Step-by-step install, Costs, Maintenance etc Let’s go.
Plastic Edging Is the Best Choice for Beginners and Tight Budgets
Recycled plastic edging such as HDPE-based products provides an excellent alternative to traditional materials like wood or metal which can degrade over time and require frequent replacement.
The pound-in no-dig style is the easiest to work with. Flexible enough to handle curves. No trench needed. You can finish it in an afternoon. The downside? Standard plastic typically lasts only 3 to 5 years before UV wear starts showing. If you want something that holds up longer, HDPE recycled plastic is a better version of the same idea tougher and more eco-conscious.
Best for: beginner DIYers, curved garden beds, budgets under $20 per linear foot.
Metal Edging Lasts the Longest and Looks the Most Professional
Aluminum edging offers a 30+ year lifespan with no rust, cracking, or brittleness. It holds clean straight lines without shifting. Steel is even tougher. Galvanized steel lasts 20 to 40+ years. Corten steel can go 50 to 100+ years in mild climates.
Wear gloves during install. The edges are sharp. But the result is worth it — especially for modern lawns and straight-line designs where you want a bold defined border that holds its shape for decades.
Best for: modern yards, straight lines, homeowners who want to install once and forget it.
Read more: I Spent $47 Building This Compost Bin My Lawn Has Never Look Better
Stone and Concrete Edging Gives You a Permanent High-End Look
This is the premium route. Natural stone can last 30 to 100+ years. Brick lasts 20 to 50+ years when properly installed. These materials feel heavy and substantial because they are. They add serious visual weight to a yard.
The labor is heavier too. Stone edging takes skill to set properly. It does not work well for tight curves But on sloped yards and high-end properties, nothing else comes close.
Best for: upscale homes, sloped yards, permanent installations.
Shovel-Only Edging Costs Nothing and Still Gets the Job Done
You can create a lawn edge at any time of year using only a half-moon edger or flat-backed spade. No dedicated edging materials needed at all.
Zero cost. Zero products. Just a clean trench between lawn and bed. The catch is upkeep. Grass will creep back in over time. You will need to re-edge every few weeks through growing season. Great for minimalist gardens or anyone testing out edging before committing to a material.
Tips: minimalist gardens, budget-zero projects, temporary solutions.
These Are the Tools You Need Before You Start
You do not need a lot of gear. Here is what to have ready.
A half-moon edger or flat spade handles the cutting. A rubber mallet drives in stakes. A level keeps things straight. Garden stakes or 8-inch landscape spikes hold everything in place. You also need a tape measure, string line, and canes or pins for marking your layout.
For longer runs, a gas edger rental costs around $50 per day and cuts the trench work fast. For plastic edging joints, PVC cement locks sections together cleanly.
Recycled HDPE stakes and spikes contain no harmful chemicals that could leach into soil or water safe for residential yards and environmentally sensitive areas. Worth choosing over standard plastic hardware when you can find them.
Spring Is the Best Time to Install Lawn Edging
Timing matters more than most people think.
Soil is easier to work with when it’s moist. Spring is the ideal season. If possible wait until after rainfall so the ground is soft and workable. Fall works too Avoid dry summer days when the soil is hard and cracked. Avoid frozen ground in winter.
Both extremes make the job harder and can damage your lawn in the process.
Read more: How To Make Your Own Pathway In A Grass Area: Step-By-Step Guide
Step1: Marked Lines Lead to Straighter Edges
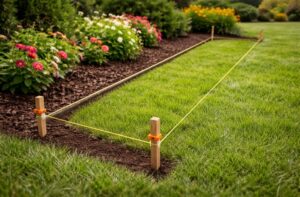
Start by marking where your edge will go.
Use a string line tied between two canes or pegs for straight edges. For curved edges use something flexible like a hosepipe or rope laid along the ground. Once it is set, step back and look. Viewing the marked edge from an upstairs window gives you a full picture of the shape. Make adjustments before you cut anything. It is much easier to move a hose than to fix a bad trench.
Before digging, call 811 in the US to have underground utilities marked. Always wear gloves. A small step that saves big problems.
Step2: A V-Shaped Trench Gives the Cleanest Result
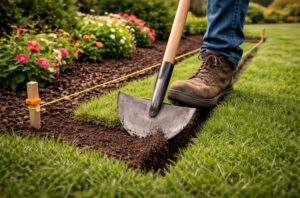
Score the soil first. Walk your line and press the tip of your spade into the ground to mark it. Then go back and cut the actual trench.
Drive your shovel in at a 45-degree angle to create a V-shaped trench. This angle gives you a cleaner more stable edge than a straight vertical cut. Go about 3 to 4 inches deep when first marking the edge. Anything less gives a less effective border. For aggressive grass types like Bermuda, go deeper 5 to 6 inches stops underground runners from crossing over.
Work in small overlapping cuts. This keeps your line smooth and continuous. Finish by leveling the bottom of the trench with the flat back of your spade.
Step3: A Sand and Gravel Base Prevents Shifting Later
Good prep here saves you reset work down the road.
Tamp the area down before adding a few inches of crushed gravel and then sand. This improves drainage and creates a stable foundation under your edging.
Going no-dig with pound-in plastic? Skip the gravel. Pound-in plastic edging can be knocked directly in with a rubber mallet. Making a shallow slot with an edging spade first makes it easier to get straight. Line it up, Tap level, Drive stakes.
Step 4: Overlapping Sections and Leveling as You Go Locks It In
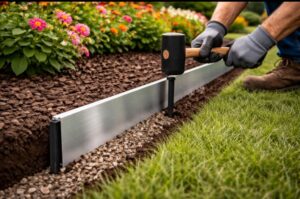
Now the edging goes in.
For plastic or flexible edging: set it in the trench. Overlap each section by about 2 inches at the joints. Tap everything level as you move along. Space stakes every 750mm to 1000mm for raised edging. On curves and direction changes space them closer together.
For aluminum edging: set it in the trench, check level, anchor with stakes. Aluminum edging features anti frost heave technology using stake pockets angled at 45 degrees to prevent displacement during freeze-thaw cycles. This matters a lot in cold climates where ground movement is common.
For slopes: use stepped stone edging. Each section sits at a slightly lower height than the last. It follows the grade naturally instead of fighting it.
Step5: Backfilling and Watering Settles Everything Into Place
Almost done.
Push soil firmly against the outside face of your edging. Add mulch to the garden bed side it holds moisture and blocks weeds from taking hold. Then water the whole area well.
Wait about a week before mowing close to new edging. This gives the soil time to firm up and hold everything in position. After that first week your new edge is ready for regular lawn care.
Annual Inspections Keep Edging from Shifting Out of Place
Here is the thing about edging. Even good material moves over time. Soil shifts. Frost pushes things up. Rain loosens stakes. A little attention once a year keeps it all in line.
Once a year walk your landscape and check for signs of movement, cracking or damage along the borders. Push raised sections back into place. Swap out any broken stakes right away.
Use a spade or edging tool to trim back turf and keep a clean defined border. Clear away mulch, leaves and debris that build up around the edging to prevent mildew. After heavy rain or a freeze, do a quick walk-around. Tap stakes deeper and reinforce curves and corners where pressure is greatest.
And give your string trimmer some space. Contact with lawn mowers and trimmers is one of the top causes of edging damage. Leave a small hand-trim buffer zone around the edging. For plastic edging in full sun, a UV protectant spray made for outdoor plastic helps keep color and flexibility from fading between seasons.
Here Is What 50 Feet of Lawn Edging Costs in 2026
No surprises. Here is the real breakdown.
Plastic edging costs $1 to $3.50 per linear foot. It is the lowest upfront cost option but typically needs replacement every few years. For 50 feet: roughly $50 to $175. Install time: 2 to 4 hours.
Aluminum edging runs $3 to $8 per linear foot. It delivers the lowest lifetime cost because of permanent performance and zero maintenance requirements. For 50 feet: around $150 to $400. Install time: 4 to 6 hours.
Steel edging costs $3.50 to $12 per linear foot depending on type. Corten steel sits at the top end the biggest upfront spend but essentially a permanent solution.
Stone or concrete is the premium tier. Natural stone can run $12 to $70 per linear foot including labor. For 50 feet: $600 and up. Expect 6 to 10 hours of labor.
Hiring a pro? Add $300 or more in labor for most standard installs. DIY keeps that in your wallet.
Stepped Concrete Works Best on Sloped Yards
Slopes are tricky. Regular edging wants to run level but the ground does not cooperate.
Stepped concrete or stone edging solves this. You install each section at a slightly lower level than the previous one. The sections stair-step down the slope. Everything stays stable. No gaps. No tilting. For steep grades this is really the only method that holds long-term.
Recycled Plastic Is the Most Eco-Friendly Edging Option Right Now
If going green matters to you and in 2026 it matters to a lot of people, recycled plastic is the answer.
Recycled HDPE plastic edging is made from post-consumer and post-industrial recycled plastics. It reduces landfill waste and gives plastic a second life in sustainable landscaping projects. It does not leach chemicals into soil. It handles temperature extremes well. And it outlasts standard cheap plastic by years.
DIY Saves You $300 or More Compared to Hiring a Pro
Lawn edging is relatively easy to install yourself with basic tools. Most homeowners can complete a standard edging project in a few hours.
Plastic and pound-in styles are the easiest starting point. No special skills needed. No big equipment. Just a mallet, some stakes, and an afternoon. Metal and stone edging have a steeper learning curve. For those materials especially poured concrete a pro install is worth the cost to get the base right.
But for most yards? Do it yourself. Save the money. Learn the skill. Your lawn will thank you.
FAQs
What edging works best on a sloped yard?
Stepped concrete or stone edging is the most reliable option for slopes. Each section is installed at a slightly lower level than the one before it. The sections stair-step down the grade. No gaps. No tilting. For steep yards this is really the only method that holds up long-term without shifting.
What is the most eco-friendly edging option?
Recycled HDPE plastic edging is your best bet. It is made from post-consumer and post-industrial recycled plastics which diverts plastic waste from landfills and gives it a useful second life. It releases no harmful chemicals into soil or water. It handles temperature swings well. And it lasts far longer than standard cheap plastic.
How much money does DIY edging save vs. hiring a pro?
Quite a bit. Most standard installs add $300 or more in labor when you hire out. Lawn edging is relatively easy to do yourself with basic tools and most homeowners finish in a few hours. Plastic and pound-in edging are the most beginner-friendly. Heavy stone or poured concrete is where a pro becomes worth it to get the base right.
How often does lawn edging need to be reset or fixed?
Once a year is enough for most yards. Walk the full edging line and look for movement, cracking or loose stakes. Push anything raised back into place. Replace broken stakes on the spot. After heavy rain or a hard frost do a quick check too. That small routine keeps your borders looking clean season after season.
Should beginners start with plastic or metal edging?
Start with plastic. It is the lowest upfront cost at $1 to $3.50 per linear foot. Install is simple. No trench required for the pound-in style. Curves are easy to handle. Once you are comfortable with the process, upgrading to aluminum or steel is always an option down the road.
The END
There is something satisfying about stepping back and seeing those clean lines for the first time. The lawn looks like a completely different yard. More intentional. More cared for.
Pick a material that fits your budget. Grab a half-moon edger or some HDPE pound-in strips. Mark your line on a Saturday morning when the soil is still a little damp. And by afternoon you will have a yard that stands out on the street.
For more practical lawn care tips like this, keep coming back to Ex Landscaper. Thanks for reading and if you have any question just comment bellow. Bye
Read more: How to Build a Lawn Border: Complete Guide


