If your lawn still looks thin and pale even after regular watering and fertilizing, thatch may be the problem. Thatch is the organic layer that builds up between the soil and the grass, made up of both dead and living plant material. A small amount of thatch is normal. However when it becomes too thick, water and nutrients can no longer reach the roots properly. In this article we will cover how to check for thatch, the right time to remove it and the correct methods for doing so.
What Is Thatch?
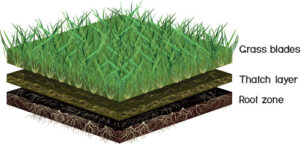
Thatch forms from dead grass stems, roots and crowns that accumulate just above the soil surface. As grass grows, older plant material naturally dies off, creating this layer over time. A thatch layer of half an inch or less is actually beneficial. It helps the soil retain moisture and protects it from temperature fluctuations.
The problem begins when thatch accumulates faster than it decomposes. Once it becomes thicker than half an inch, it starts acting like a mat. Rainwater stays on the surface instead of soaking into the soil. Fertilizer cannot reach the roots. Grass roots begin growing inside the thatch instead of the soil, making them shallow and weak.
Does Your Lawn Really Need Dethatching?
Not every lawn needs dethatching. Before renting a machine or grabbing a rake, first check how much thatch has actually built up.
How to Check Thatch Thickness
Use a trowel to cut out a small wedge three to four inches deep and lift it out. Look at the layers — green grass on top, a brown layer underneath, then soil. That brown layer is the thatch. If it measures one inch or more, it’s time to dethatch.
Signs of a Thatch Problem
Even without digging, you can spot the problem by these signs:
– The lawn feels soft or spongy when you walk on it
– Water runs off the surface instead of soaking into the soil
– Grass looks pale or thin despite regular care
– Fertilizer doesn’t seem to make any difference
Which Grass Types Build Up More Thatch?
Not all grass types accumulate thatch at the same rate. Kentucky bluegrass, Bermudagrass and Zoysiagrass are high-risk varieties. They spread through stolons and rhizomes, which decompose slowly and pile up quickly. If your lawn has these grass types, you’ll need to dethatch more often.
Tall fescue and perennial ryegrass grow in clumps. They rarely develop serious thatch problems — once every few years is usually enough and in many cases it’s not needed at all.
Read More: Why Is My Grass Turning Yellow? (Causes & Solutions)
When to Dethatch Your Lawn
Timing is more important than most people realize. Dethatching places stress on the grass. If the lawn is already weak when you do it, recovery can take much longer and sometimes it may never fully recover. Having worked on many lawns over the years, wrong timing is one of the most common causes of dethatching damage I have seen. The goal is to dethatch when the grass is actively growing so it can bounce back quickly.
Cool-Season Grasses (Zone 5–7)
For lawns in Zone 5–7 with Kentucky bluegrass, tall fescue or perennial ryegrass, the best window is late summer to early fall — roughly August through mid-September. By then, temperatures have cooled, the grass is growing actively again and there is enough time to recover before the first frost.
Spring is also an option but it comes with one drawback. Dethatching opens up the soil surface, which gives weed seeds a chance to germinate. If you choose spring, wait until after the second mowing of the year and finish before temperatures consistently reach 75°F.
How often: Thatch-prone grasses like Kentucky bluegrass generally need dethatching once a year. Lower-risk grasses such as tall fescue only need it once every three to five years.
Warm-Season Grasses
Bermudagrass, Zoysiagrass and similar varieties should be dethatched in late spring to early summer — after the lawn has fully greened up. Dethatching before the grass comes out of dormancy can cause significant damage.
When NOT to Dethatch
Avoid dethatching under these conditions:
– When the lawn is dormant or drought-stressed
– Right after a heat wave or hard freeze
– When the soil is wet from rain — heavy equipment on wet soil compacts it and tears up healthy grass
How to Dethatch a Lawn (Step by Step)
Step 1: Mow the Grass Short First
Before dethatching, cut the grass down to about half its normal height. This allows the dethatcher to reach the thatch layer more easily. Bag the clippings instead of leaving them on the lawn.
Step 2: Choose the Right Tool
The right tool depends on how thick the thatch is and how large your lawn is.
Dethatching Rake — Best for small lawns and light thatch. A manual rake with short curved tines that dig into the thatch and pull it to the surface. It takes effort but gives good control.
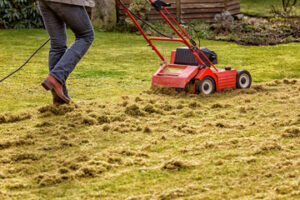
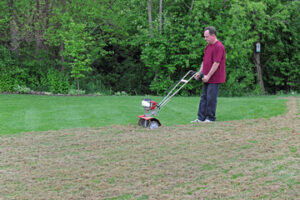
Power Rake — A motorized machine with rotating tines. Ideal for larger lawns with moderate thatch. Available at most equipment rental stores.
Verticutter (Vertical Mower) — For thatch layers thicker than one inch. Vertical blades cut through the thatch and reach the soil surface. This is an aggressive method so only use it when absolutely necessary.
Liquid Dethatcher — If the thatch layer is thin or you want to use it as a preventive measure, this can be an option. It contains enzymes and microorganisms that help break down thatch. Keep in mind, though, that it is not a replacement for mechanical dethatching — it only works as a supplement.
Read More: Why Is My Lawn Thin? 5 Common Causes & How to Diagnose
Step 3: Mark Sprinkler Heads and Irrigation Lines
Before running any machine across the lawn, flag all sprinkler heads and shallow irrigation lines. Dethatcher blades can crack sprinkler heads on contact. Five minutes of marking can save you from a much bigger repair job later.
Step 4: Run the Dethatcher
Set the blade depth so it goes generally no more than half an inch into the soil. Make one pass across the entire lawn in a single direction. If the thatch is thick, make a second pass perpendicular to the first. The lawn will look a bit rough when you’re done — this is completely normal.
Step 5: Rake Up and Remove the Debris
After dethatching, a large amount of material will be sitting on the surface. Rake it all up and remove it. Leaving it behind will simply add it back to the thatch layer. If the lawn has not been heavily treated with pesticides, the material can be composted.
Step 6: Water, Fertilize and Wait
Dethatching stresses the grass, so water the lawn thoroughly as soon as you finish. Apply fertilizer to support new root growth. The lawn may look rough for about two weeks but within three to four weeks it will generally start filling back in.
Read More: 7 Easy Steps to Fix Bare Spots in Your Patchy Lawn This Spring
Mistakes That Can Damage Your Lawn
Wrong timing: Dethatching during a heat wave or while the grass is dormant makes recovery very difficult. Stick to the active growth window for your grass type. And keep in mind — dethatching is not always the answer. Sometimes the problem is not thatch but soil compaction. These are two different problems and the solutions are different too.
Working on wet soil: Running a power rake or verticutter after heavy rain tears up healthy grass and compacts the soil underneath. Wait one or two days after heavy rainfall before starting.
Removing too much at once: If the thatch layer is more than two inches thick, do not try to remove it all in one session. It can cause serious damage to the root system. Break it into two or three sessions spaced a few weeks apart.
Skipping the water afterward: Dethatching opens up the soil and temporarily weakens the grass. Without watering afterward, recovery slows down and the roots may dry out.
Conclusion
Most lawns do not need dethatching every year. But once the thatch layer exceeds one inch, neither watering nor fertilizing will solve the problem. At that point, the job is to measure the layer, pick the right time, use the right tool and give the lawn a few weeks to recover. Get the timing right and half the work takes care of itself. At Ex Landscaper, we focus on practical lawn care that actually works for homeowners in real growing conditions.
Read More: Dandelions Keep Coming Back? Why and How to Finally Stop Them
FAQs
Q1: Can I dethatch and aerate on the same day?
Yes, and it actually works well together. Dethatch first, remove the debris, then aerate. Following this order means the aerator tines can penetrate the soil more easily without the thatch layer in the way.
Q2: My lawn looks bad after dethatching — did I do something wrong?
No, there is nothing to worry about. Brown patches, thin spots and a rough appearance right after dethatching are completely normal. A lot of material has been removed and the grass is temporarily under stress. Keep watering and wait three to four weeks. The lawn will fill back in.
Q3: Can I dethatch a wet lawn?
It is best to avoid it. Wet soil compacts easily under heavy equipment, and the tines or blades tend to pull up healthy grass along with the thatch. Wait one or two days after heavy rain until the soil is moist but no longer muddy.
Q4: Are dethatching and scarifying the same thing?
Similar but not the same. Scarifying uses vertical blades that cut deeper into the soil surface, making it more aggressive than standard dethatching. It is generally used for severely neglected lawns or those with very thick thatch buildup.
Q5: Should I overseed after dethatching?
Fall dethatching is a great opportunity to overseed, especially for Zone 5–7 lawns. Dethatching opens up the soil surface and improves seed-to-soil contact. Overseed within one or two days of dethatching while the surface is still exposed.
Okay Thanks for reading and if you have any question just comment bellow. Bye Bye……………..!
Read More: Expert Lawn Watering Schedule: How Much and When to Water Your Grass