We do so much to keep our lawn beautiful – mowing the grass, fertilizing it taking regular care of it. So when someone says “tear up a part of this lawn and build a garden bed here” it’s natural to feel a bit hesitant.
But the good news is, it is not really a matter of having to choose between your lawn and a garden. Both can exist in the same yard. Done right, a garden bed will actually enhance the beauty of your lawn. However, theres one thing many people don’t mention—how to take care of the surrounding grass after building a garden bed. Today we’ll learn exactly that in a simple way.
While working at ExLandscaper, we have seen many times that people give almost no thought to their lawn while building a raised garden bed. And that’s exactly when various problems begin.
People run into trouble mowing because the mower can not move easily. The wet grass beside the bed causes the wood to start deteriorating quickly. And often grass roots end up growing into the bed and stealing nutrients from the plants. As a result the entire yard starts to look messy.
That’s why we have arranged every step of today’s article with the lawn in mind. And throughout the article, you will find some special Lawn Lover’s Tips. These are not discussed in most guides, but they are very important for keeping your lawn beautiful and healthy.
Think About Your Lawn Before Building a Raised Bed
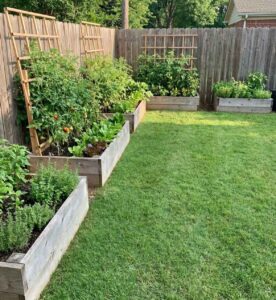
Many people assume that a beautiful lawn and a raised garden bed can’t coexist. But the reality is with the right planning, the two can fit together wonderfully in the same yard.
In fact, having only a grass lawn can sometimes feel monotonous. On the other hand, having only a garden bed can throw off the balance of the yard. But a combination of green lawn and plants creates a neat, attractive and well-tended landscape.
The problem isn’t with the concept of raised beds – the problem arises from a lack of planning. Building a bed without considering the lawn leads to a few common issues, such as
- Mowing the grass becomes difficult.
- If wet grass stays in contact with the wood for a long time, the wood can deteriorate quickly.
- Over time, grass roots can enter the garden bed and create weed problems.
On the other hand, if you build the raised bed keeping the lawn’s needs in mind, the result is completely different. The lawn’s borders look more defined and neat. The whole yard’s layout feels planned and well-organized. This increases the beauty while also making maintenance easier.
The main goal of this guide is to highlight techniques that will let you build an effective raised garden bed while also maintaining the beauty and health of your lawn.
Lawn Lover’s Tip: Before starting any plan, ask yourself one question—will this decision make mowing easier in the future, or harder? If maintenance becomes complicated, it’s better to reconsider the plan.
Read More: How I Built a Natural Grass Pathway in My Yard
Think About These 3 Things Before Buying a Single Board
Many people go straight to the store and buy wood or other materials without any plan. But that’s exactly where most problems begin. If you take just 30 minutes at the start to think things through, you can avoid a lot of hassle later.
1. Where does sunlight fall and what effect will it have on the lawn?
Most vegetable plants need at least 6 to 8 hours of direct sunlight each day. Many people already know this. However, what many dont notice is what effect the shadow from the raised bed’s plants can have on the surrounding lawn.
Tall plants like tomatoes, cucumbers or others cast fairly long shadows once they grow tall. If these plants are positioned so their shadow falls on the lawn for most of the day, the grass won’t get enough light. As a result the grass can weaken, thin out and even some patches may become bare.
The simple solution is to plant taller plants on the north side of the bed. This way, the shadow falls away from the lawn instead of onto it. Also, if possible it’s good to position the bed in a north-south orientation so that sunlight reaches both sides evenly.
My advice: Before finalizing the bed’s location, observe the area for at least one day. Notice where sunlight and shadow fall in the morning, midday and afternoon. This small bit of planning can save you from many future problems.
2. Get the bed’s size and the spacing between beds right
The ideal width of a raised bed generally should not exceed 4 feet. This allows you to easily reach the middle from either side without needing to step on the soil.
For length, it’s good to stay within 10 to 12 feet. Building a bed longer than this increases the risk of the wood warping over time.
The bed’s height depends on the condition of your soil. If the soil is reasonably good, a height of 8 to 10 inches is enough. But if the soil is hard, compacted or infertile, you can go up to 12 inches in height.
If you are building multiple beds, it’s also important to pay attention to the spacing between them. Building beds too close together makes working and moving around difficult. Generally, keeping a distance of 36 to 48 inches (about 3 to 4 feet) is convenient for working and the beds also won’t cast excessive shadow on each other.
Advice for you: Before permanently placing the bed, sketch out the possible shape on the lawn using a garden hose, rope or chalk line. Then take your lawn mower and move around that area. If anywhere feels too narrow, change the layout right then.
3. Keep wood away from contact with wet grass
Many people place a wooden raised bed directly on the grass. But this increases the risk of the wood deteriorating quickly.
This is because wet grass holds moisture for a long time. After rain or irrigation, if that moisture stays in contact with the wood, decay can gradually begin. Even good-quality wood can become damaged over time.
So it’s extremely important to keep a protective layer or buffer between the wood and the grass. This not only increases the wood’s durability but also protects your entire investment in the long run.
Tip for lawn lovers: Never place a wooden raised bed directly on wet grass. Taking the right measures from the start will significantly reduce the cost of unnecessary repairs or rebuilding later.
Read More: Stop Messy Lawn Edges: How to Install Lawn Edging the Right Way
Which Wood Lasts Longest Beside a Lawn?
Choosing the right material is more important for a garden area beside a lawn. The moisture from the surrounding grass, splashing irrigation water and rainwater runoff all work against the wood. Some materials can handle this well.
| Material | Lifespan | Resistance to Lawn Moisture | Cost |
|---|---|---|---|
| Cedar | 10–15 years | Resistant | Moderate |
| Redwood | 20+ years | Very Resistant | High |
| Douglas Fir | 4–7 years | Moderate seal it | Low to Moderate |
| Pine | 2–5 years | Poor | Cheapest |
| Galvanized Steel | Highly Durable | Excellent | Moderate |
| Concrete Block | Long-lasting | Excellent | Moderate |
Cedar is the most popular choice and for good reason. It contains natural tannins that resist decay and pests without any chemical treatment. Beside a lawn, where moisture is constant, that natural resistance really comes in handy. You can get 10 to 15 years of good performance.
Redwood lasts even longer and resists moisture extremely well. The cost is higher but it’s worth considering for a permanent installation beside a lawn.
Douglas fir is an effective budget option but only if the wood is sealed before installation. Unsealed fir will start decaying within a few years in a lawn environment.
Galvanized steel has no risk of decay at all. It handles lawn moisture perfectly and gives the yard a clean, modern look. It heats up in direct sunlight, which warms the soil faster in spring an advantage in Zones 5 and 6.
An important note about pressure-treated lumber: the debate over the food safety of modern ACQ-treated wood is still ongoing. For vegetable gardens, it’s safer to avoid it until a clear consensus emerges.
Lawn Lover’s Tip: Whatever material you choose, never place it directly on wet grass. A thin layer of gravel or a mulch strip between the wood and the lawn adds years to the frame’s lifespan.

How to Build a Bed Without Damaging Your Lawn
Building a raised garden bed is not very difficult. With the necessary tools and proper planning, even beginners can build a standard 4 × 8 foot bed within a few hours.
However, the key to success is following each step correctly and keeping the lawn in mind throughout the process.
What you’ll need:
- Measuring tape
- Hand saw or circular saw
- Power drill
- 3.5 inch exterior screws
- Level
- Rubber mallet
- Shovel
- Rake
STEP 1: Mark the location first
Instead of starting construction right away, first carefully mark where the bed will go. Use rope, stakes or a garden hose to draw the bed’s potential shape on the lawn.
Then run your lawn mower around that marked area. If movement feels too tight anywhere, change the layout right then—because once the bed is built, making changes later can be quite a hassle.
At the same time, observe the direction of sunlight and shadow. Stand there in the morning and afternoon and see where the shadow might fall once the plants grow taller in the future. Try to ensure that shadow doesn’t fall on the lawn for long periods.
Read More: I Spent $47 Building This Compost Bin My Lawn Has Never Look Better
STEP 2: Prepare the soil
Cut the grass in the marked area as short as possible. However, theres no need to remove the grass.
Next, lay 3 to 5 layers of cardboard over the entire area. Overlap the edges of the cardboard by at least 6 inches so there are no gaps.
This cardboard reduces the growth of the grass underneath and gradually decomposes to add organic matter to the soil.
If your lawn has fast-spreading grass, you can also use a landscape fabric on top of the cardboard for extra protection.
Tip for lawn lovers: Think it over once more before permanently deciding on the bed’s location. Because once the bed is built that section of lawn won’t be the same as before. Make sure you’re satisfied with the chosen spot.
STEP 3: Level the ground
Many people skip this step, yet it can be the cause of many future problems.
If the ground under the bed is uneven, water can pool on one side and the soil pressure won’t be evenly distributed either. This increases the risk of damage to the bed’s structure.
Use a level or a straight board to check all around and adjust by removing or adding soil as needed to level it.
STEP 4: Build the frame
Now join the wooden boards together using screws to build the frame.
For extra strength and durability, you can use 4 × 4 corner posts at each corner. Once the frame is built, use the level again to confirm it’s sitting evenly.
If your area has a problem with burrowing animals, you can attach hardware cloth to the bottom of the frame. This will keep out unwanted animals while still allowing earthworms to move through easily.
Read More: How To Make Your Own Pathway In A Grass Area: Step-By-Step Guide
STEP 5: Verify the final position
Place the finished frame on top of the cardboard and observe it carefully from all around.
Stand on the lawn side and look – does it appear balanced? Does it fit well with the entire yard? Does it feel like it belongs right in this spot?
If any changes feel necessary, make them now.
My advice: This is your last easy chance to move it before filling the frame with soil. Once the bed is filled, moving it becomes much more difficult. So take some extra time at this stage and make sure everything is right.
What Kind of Soil Should You Use in a Raised Bed?
Many people think that since their lawn’s grass grows well that same soil should work fine in a raised bed too. But in reality it’s quite the opposite.
Lawn soil is generally suited for grass but not ideal for growing vegetables. Using this soil in a raised bed can cause it to become hard and compacted over time, which disrupts drainage and prevents plant roots from getting enough air. It may also contain weed seeds or soil-borne pathogens.
So it’s best to use a growing mix specifically prepared for raised beds.
Simple and reliable solution: 50/50 mix
For those just starting to grow vegetables in a raised bed, this is a simple and effective method.
This mixture should contain:
- 50% good quality topsoil
- 50% mature compost
This mix is suitable for most vegetable plants. Adding some extra compost at the end of each season further improves the soil quality.
For better yield: the three-part mix
For those who want to use a more advanced growing medium, the following mixture can be considered:
- One-third compost
- One-third coconut coir
- One-third coarse vermiculite
This mixture has several advantages. It helps drain water easily while still retaining necessary moisture. It also creates room for sufficient airflow around the roots, which is extremely important for healthy plant growth.
Coconut coir is now widely used as an alternative to peat moss, because it is relatively more environmentally friendly and works just as effectively.
How deep a bed do different plants need?
Not all plant roots go equally deep. So when determining the bed’s depth, it’s important to consider what you plan to grow.
| Crop Type | Required Depth |
|---|---|
| Lettuce, spinach, radishes and various herbs | About 6 inches |
| Tomatoes, peppers, cucumbers and bean-type crops | 10–12 inches |
| Carrots, beets and other deep-rooted crops | 12 inches or more |
If you want to grow various types of vegetables in the same bed, a depth of 10 to 12 inches generally gives good results in most cases.
My advice: Be careful while filling the raised bed with soil so that excess soil doesn’t spill onto the surrounding lawn. If a layer of soil builds up on top of the grass, light and airflow can be reduced, risking damage to some patches of grass. If soil does spill, clean it up as quickly as possible.
Protect the Bed From the Lawn and the Lawn From the Bed
After building a raised garden bed, most people focus only on caring for the plants. But one important matter is often overlooked – the relationship between the bed and the lawn.
In reality, these two parts affect each other. Grass roots want to enter the bed, the bed’s moisture can damage the wooden frame, and lawn maintenance tools can accidentally damage the bed’s edges.
So it’s important to take some preventive measures from the very beginning, so that both the bed and the lawn stay in good condition for a long time.
Why is a buffer zone necessary?
If the raised bed’s wood stays in direct contact with wet grass, decay can begin over time. This is because wet grass holds moisture for a long time.
In addition while mowing the lawn, the mower or string trimmer often strikes the bed’s wood, causing marks or the start of decay.
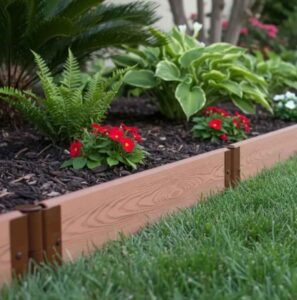
To avoid this problem, it’s good to create a buffer zone between the bed and the lawn. Using a narrow strip of gravel or mulch:
- Keeps the wood relatively dry,
- Prevents the grass from coming into direct contact with the frame,
- Makes mowing easier.
Install the edging so that it actually works
It’s not enough to use edging just for a nice look from above – it needs to be installed in a way that actually controls the grass roots too.
Many grasses spread sideways underground. So for effective edging, it should be set at least 6 inches deep into the soil.
Steel edging
Steel edging is a popular and practical solution. Because it’s thin, it does not stand out much and creates a clean, neat boundary line. This also makes mowing easier.
Brick edging
For those who prefer a traditional or classic look, brick is a good option. However, it needs to be set on a proper base to keep it level over the long term.
Stone edging
Stone edging pairs beautifully with a natural setting or a cottage-style garden. It takes some time to install but is generally long-lasting.
What is a mowing strip and why is it useful?
A mowing strip is a hard surface built along the edge of the bed, usually made of pavers, brick or concrete.
It’s installed so that the lawn mower’s wheel can easily roll over it. This makes it possible to mow the grass right up to the very edge of the bed, reducing the need for separate trimming.
A mowing strip that’s generally 8 to 12 inches wide is convenient. Over the long term, this saves both time and effort.
How should you create paths between beds?
If you have multiple raised beds, the paths between them should also be part of your planning.
Below are the benefits and limitations of different path types:
| Path Type | Can a Mower Be Used? | Risk of Grass Spreading | Maintenance |
|---|---|---|---|
| Grass path | Yes | High | Requires regular mowing |
| Gravel | No | Low | Occasionally needs re-leveling |
| Wood chips | No | Low | May need new chips added once a year |
| Stone pavers | No | Very low | Relatively low maintenance |
Whatever type of path you choose, try to keep it at least 3 feet wide. This allows easy movement of a wheelbarrow or other equipment.
And if you want to keep a grass path between beds, make the path’s width such that your lawn mower can cut the entire section in one pass. This will reduce the need for extra trimming.
My advice: Creating a narrow gravel strip around each raised bed is a small investment but its benefits are significant. It protects the wood from moisture, reduces the spread of grass roots and also makes lawn maintenance easier.
Read More: How to Build a Lawn Border: Complete Guide
Make Your Yard Look Even More Beautiful After Installing the Raised Bed
The purpose of building a raised garden bed isn’t just to grow vegetables. The goal should be to create a yard that looks neat, planned and aesthetically pleasing.
In other words, the bed and the lawn shouldn’t feel like two separate parts but should feel like part of the same overall design.
A few simple things can be kept in mind to create this balance.
Choose materials that match your home’s design
A raised bed isn’t just a growing space it’s also a visible part of your yard.
So when choosing the bed’s materials, it’s good to consider the overall style of your home.
- For modern home designs, galvanized steel or metal beds are quite fitting.
- For traditional or cottage-style homes, wooden beds look more natural.
- If you prefer natural materials, cedar or composite materials can also be a good alternative.
Whatever material you choose, make sure it’s in harmony with the overall beauty of the yard.
Determine the bed’s size according to the yard’s size
Balance is also important when choosing the bed’s size.
A small bed in the middle of a very large open lawn often doesn’t catch the eye. On the other hand, an oversized bed in a small yard can make the space feel cluttered or cramped.
So the bed’s size should complement the scale of the lawn and maintain harmony with the entire yard.
Maintain consistency with the existing design
When building a new bed, try to maintain consistency with whatever lines or shapes already exist in your yard.
For example:
- If the lawn’s borders and paths are built in straight lines, a rectangular bed will suit it well.
- If the yard has curved paths or a rounded design, a slightly curved bed will look more natural.
This will make the entire design feel planned and balanced.
Think about where to plant tall plants
Tomatoes, cucumbers or other stake-dependent plants can become quite tall once grown.
These types of plants are best planted on the side of the bed that’s relatively farther from the open lawn.
On the other hand, planting comparatively shorter plants at the front of the bed creates a sense of gradual transition. This makes the whole garden look neater and more attractive.
Even small changes can have a big impact
Sometimes a few small design decisions can completely change the look of the entire yard.
For example:
- Using the same type of bed,
- Keeping equal spacing between beds,
- Using clean edging,
- Regularly maintaining the paths.
These small details together can turn an ordinary yard into a well-planned landscape.
My advice for you: You can plant small border plants along the outer edge of the raised bed. This makes the transition between the bed and the lawn look more natural. Plants like marigold, thyme or sweet alyssum can be good choices in this case. These don’t grow very tall, look neat and add extra color and beauty around the bed.
Read More: How to Install Landscape Edging: Complete DIY Guide for Professional Results
When Should You Build a Raised Bed?
Timing also matters when building a raised garden bed. Starting at the right time means the bed becomes ready for use, and the surrounding lawn can also return to its normal condition quickly.
However, the ideal time for building a bed depends on your area’s weather and the severity of winter.
Average frost schedule for different climate zones
International garden planning generally uses USDA hardiness zones. If you follow this zone-based guidance, the schedule below can be helpful.
| Zone | Likely Last Frost | Likely First Frost |
|---|---|---|
| Zone 5 | Mid-May | Mid-October |
| Zone 6 | Mid-April | Late October |
| Zone 7 | Late March | Mid-November |
The right time to build a bed
Zones 5 and 6
In this region, March and April are generally considered the best time to build a bed.
During this time, the soil becomes workable but the lawn’s rapid growth has not started yet. As a result whatever minor damage occurs to the grass during construction largely recovers before summer arrives.
Zone 7
For Zone 7 the period from February to March is suitable for building a bed.
Additionally late October through November can also be a good alternative, especially for those who want to finish preparations before spring.
Autumn: An often-overlooked but effective time
Many people don’t think about building a bed in autumn. But this can actually be quite a convenient time.
During this time, if you cover the grass using cardboard the grass underneath gradually dies off throughout the winter. At the same time the cardboard begins to decompose and mix with the soil.
As a result, when spring arrives, the bed is largely ready and planting can begin as soon as the weather is favorable.
Caring for the bed before winter
In colder regions like Zones 5 and 6, taking some extra preparation before winter can be beneficial.
Spread 2 to 4 inches of compost on top of the bed before the first frost arrives. Then cover the soil surface with straw, dry leaves or similar organic mulch.
This significantly reduces the damage the soil might suffer from repeated freezing and thawing during winter and also keeps the soil structure in good condition.
Advice for you: Many people apply fertilizer to their lawn in autumn. At the same time you can also complete the task of adding compost to the raised bed. This saves time and allows you to handle the maintenance of both parts of the yard together.
Care for Your Lawn and Raised Bed Without Extra Effort
Caring for the lawn and the raised bed does not require separate routines. A little planning is enough to keep both in good condition easily.
Watering the bed: The soil in a raised bed dries out quickly. Insert your finger about 1 inch into the soil to check. If it feels dry, water it. Using drip irrigation or a soaker hose delivers water directly to the roots, and the lawn does not get overly wet.
Control the lawn’s grass: Regularly check the edges of the bed. If grass spreads toward the bed anywhere, cut it off quickly. Good edging or a mowing strip makes this task even easier.
Maintain the soil’s nutrients: Spread 2-4 inches of compost on top of the bed every spring and autumn. There’s no need to mix it deep into the soil over time, it will naturally work its way down.
My advice: After mowing the lawn, walk around each bed once. Addressing small issues early saves a lot of time and effort later.
These 6 Mistakes Could Damage Your Lawn
Most raised bed problems can be avoided right from the start. Below are 6 common mistakes that cause the most damage to the lawn.
1. Placing the bed directly on wet grass If wet grass stays in contact with the wooden frame the wood can decay quickly. So keep a protective layer or buffer between the frame and the grass.
2. Installing edging too shallow Even if it looks nice from above, shallow edging can’t stop grass roots spreading underground. So edging should be installed at least 6 inches deep.
3. Not having a mowing strip Without a mowing strip, the mower can’t get close enough to the bed. As a result, the remaining grass has to be trimmed separately. A mowing strip reduces this hassle.
4. Using ordinary lawn soil in the bed Lawn topsoil isn’t always suitable for raised beds. It holds too much water, drains slowly and can bring in weed seeds. So it’s best to use a growing mix suitable for raised beds.
5. Adding chemically-treated lawn clippings to the bed If any herbicide or other chemical has been used on the lawn, those grass clippings can harm vegetable plants. Only use clippings from a chemical-free lawn.
6. Building the bed without leveling the ground If the bed is placed on uneven ground, the soil can press on one side and leak out through the gap below. This can damage parts of the lawn. So level the area thoroughly before placing the bed.
Your Lawn and Garden Can Both Thrive Together
Building a raised bed doesn’t mean damaging your lawn. Rather, if planned properly it makes your entire yard more beautiful, organized and usable.
The lawn beautifully showcases the open space, while the raised bed adds beauty, order and the opportunity to grow plants. When the two exist together, your yard becomes even more attractive.
Those who build raised beds well keep the lawn in mind right from the start. Before placing the bed they plan out the convenience of mowing, the correct depth of edging and maintenance matters.
If you also keep these things in mind from the start, half the success is already there.
To learn more simple and useful information about lawn care and landscaping visit ExLandscaper.com.
Read More: How to Install Sprinkler System Yourself: Complete DIY Guide 2025
FAQs
Can a raised garden bed be built directly on grass? Yes, it can but before placing the bed, lay 3–5 layers of cardboard over the grass. This will gradually kill the grass underneath and the cardboard will later decompose and mix into the soil.
How deep should the edging be between a raised bed and the lawn? It’s good to install edging at least 6 inches deep. This prevents grass roots spreading underground from easily entering the bed.
Which wood is best for building a raised bed beside a lawn? Cedar wood is one of the best options. It doesn’t decay easily, attracts fewer pests and lasts many years even in a moist environment.
How can you stop grass from entering a raised bed? Install edging or a root barrier at least 6 inches deep around the bed. If you like you can also place a layer of gravel between the lawn and the bed. Using cardboard at the start also gives good results.
When is it good to build a raised bed in Zone 5, 6, or 7? March–April is most suitable for Zones 5 and 6 and February–March or late October through November for Zone 7. Building in late autumn is also good, because during winter the cardboard can effectively suppress the grass underneath.
Does a raised garden bed damage the adjacent lawn? No, if built and maintained properly, it doesn’t damage the lawn. However, problems can arise from excessive plant shade, excess moisture or mowing right up against the bed’s edge. With proper edging, adequate spacing and a buffer in place, these issues can be easily avoided. bye bye…..
Read More: Fix Brown Lawn Patches Fast with This Expert-Approved Method